Archaeological data
The following steps describe how to enter archaeological data into OpenAtlas. These elements are involved in the procedure:
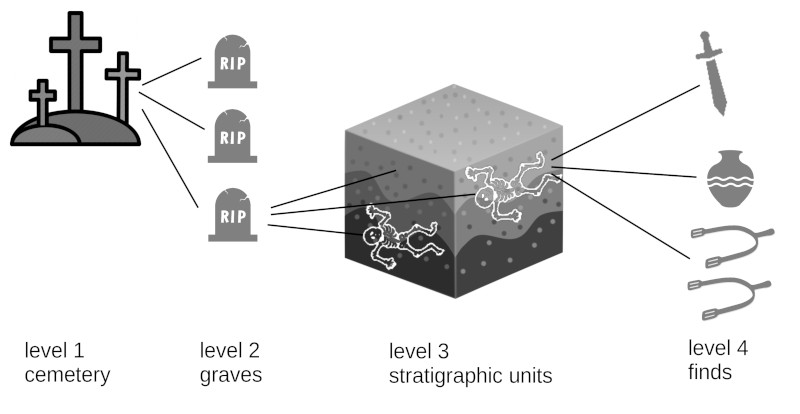
Place: The archaeological site itself (Level 1)
Feature: A subunit of the place, e.g. one or more graves, buildings, or pits. Each place can consist of multiple subunits (Level 2)
Stratigraphic unit: A subunit of a feature such as a burial or the backfilling of a grave. A feature can consist of multiple subunits (Level 3)
Artifact: An archaeological artifact, e.g. a coin or knife (Level 4)
Human remains: Bones and teeth that carry anthropological information (Level 4)
Type: Used for classification, can be extended by most users (depending on status)
Reference: Citation the information is coming from, such as books, articles or online sources concerning the site or any of its subunits
File: One or more images or other file concerning the site or any of its subunits
Adding a new place
In order to store new archaeological information in the database, the first necessary step is to create a new Place. A place is a physical thing with a certain position and/or extend in space that can be connected to various other information (temporal, spatial, events, sources etc.). To create a new place
Click on Place in the Menu and create a new entry by using the + Place button
State the site’s name
Select an appropriate Type from the list, e.g. burial site or settlement
Use the magnifier button on the map to add the site to the map as well as a GeoNames reference if desired
Add further information, e.g. evidence, an alias, a date or a description; keep in mind that some additional form fields might be required to save information
Press Insert to save the entry. Press Insert and continue to save and add another place. A new place form will open. Press Insert and add feature to save and immediately add a feature to the place. A feature form will open
To add a citation click the Reference tab after saving the entry
If you want to add an image e.g. a plot or photo of the site use the File tab after saving the entry
Adding a feature to the site
In a next step you can add a Feature to the Place. A feature can be a grave of a graveyard, a building of a settlement, etc. To add a feature to a place
Click on the Feature Tab and create a new entry by using the + Feature button or click Insert and add feature when saving a place’s information
Choose a descriptive name
Select an appropriate Type from the list
Add further information, e.g. dimensions or a description; keep in mind that some additional form fields might be required to save information
Press Insert to save the entry. Press Insert and continue to save and add another feature to the same place. A new feature form will open. Press Insert and add stratigraphic unit to save and immediately add a stratigraphic unit to the feature. A stratigraphic unit form will open
After saving the information on the feature a different citation, an image, etc. can be added in the same way as for place. Keep in mind, you can also always come back to an entry later to add or change information.
Adding a stratigraphic unit to the feature
Every Feature can consist of one or more Stratigraphic unit. For a grave this would be one or more burials and/or the backfilling.
Click on the Stratigraphic unit Tab and create a new entry by using the + Stratigraphic unit button or click Insert and add stratigraphic unit when saving information on a feature to open the stratigraphic unit form
Choose a descriptive name
Select an appropriate Type from the list, e.g. burial or interface
Add additional information on the stratigraphic unit; keep in mind that some additional form fields might be required to save information
Press Insert to save the entry. Press Insert and continue to save and add another stratigraphic unit to the same feature. A new feature form will open. Press Insert and add artifact to save and immediately add an artifact to the stratigraphic unit. An artifact form will open. Click Insert an add human remains to save and immediately add anthropological information on bones to the stratigraphic unit. A human remains form will open
After saving the information on the stratigraphic unit a different citation, an image, etc. can be added in the same way as for place. Keep in mind, you can also always come back to an entry later to add or change information.
Adding an artifact to the stratigraphic unit
The following steps add an Artifact to a Stratigraphic unit.
Add an artifact to a stratigraphic unit by clicking the Artifact tab and create a new entry by using the + Artifact button or click Insert and add artifact when saving information on a stratigraphic unit to open the artifact unit form
Choose a descriptive name
Select an appropriate Type from the list such as pottery or finger ring
Add additional information; keep in mind that some additional form fields might be required to save information
Press Insert to save the entry or Insert and continue to add another artifact to the same super immediately
Add a file or citation if desired by using the File tab
Artifacts can also be added directly to a place or feature, e.g. to add stray finds to a place. To do so, go to the place or feature you want to add an artifact to. Click the Artifact tab and then the + Artifact button. The “super” of an artifact (a place, feature, or stratigraphic unit) can be changed in the artifact’s form after pressing the Edit button. You can also create an artifact by clicking the artifact tab in the menu and the + Artifact button afterwards. The artifact can then be linked to an existing super in the form.
Adding human remains to the stratigraphic unit
Anthropological data can be entered by adding Human remains. You can do so by connecting a certain bone to a Stratigraphic unit and add all the relevant information, e.g. pathological changes, measurements, discoloration, or additional information. Please note that additional information can be entered via custom types in the stratigraphic unit entry mask, e.g. biological sex, gender, and age of an individual.
Add human remains to a stratigraphic unit by clicking the Human remains tab and create a new entry by using the + Human remains button or click Insert and add human remains when saving information on a stratigraphic unit to open the human remains form
Choose a descriptive name
Select an appropriate Type from the list such as humerus or skull
Add additional information; keep in mind that some additional form fields might be required to save information
Press Insert to save the entry or Insert and continue to add another bone or tooth to the same super immediately
Add a file or citation if desired by using the File tab
Human remains can also be added directly to a place or feature, e.g. to add stray finds to a place. To do so, go to the place or feature you want to add the remains to. Click the Artifact tab and then the + Human remains button. The “super” of a human remains entry (a place, feature, or stratigraphic unit) can be changed in the form after pressing the Edit button. You can also create human remain entries by clicking the artifact tab in the menu and the + Human remains button afterwards. The remains can then be linked to an existing super in the form.